
macOS Tips & Tricks: Split View
Master Multitasking on macOS with Split View
As Mac users, we’re all about maximizing productivity. One of macOS’s most underrated features that can help with multitasking is Split View. Whether you’re juggling a work report while researching online or comparing two documents side by side, Split View can transform the way you work. Let’s dive into how to use it and why it’s a game-changer for productivity.

What is Split View?
Split View allows you to run two apps side by side in full-screen mode without overlapping windows or distractions. This feature is perfect for:
Writing an email while referencing a document.
Comparing spreadsheets or presentations.
Keeping a communication app open alongside your workflow.
How to Use Split View on macOS
Activating Split View is simple and works seamlessly with most apps. Here’s how:
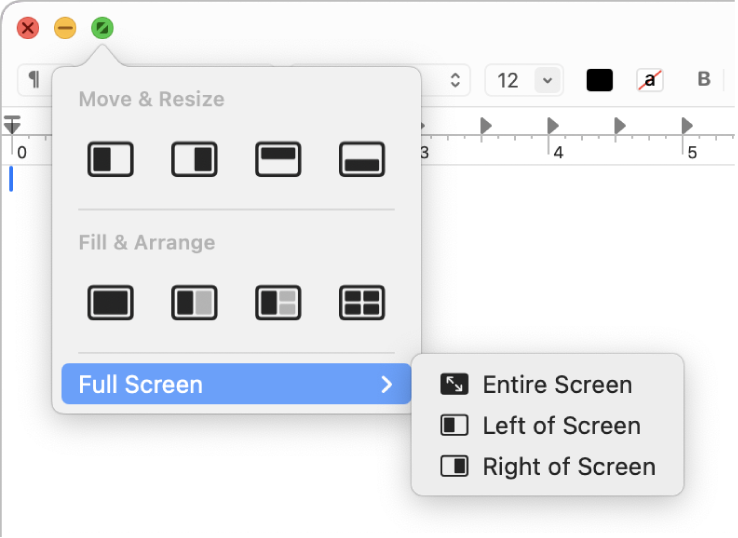
Hover Over the Green Maximize Button
Open the first app you want to use.
Move your cursor to the green button at the top-left corner of the window.
Hover over the button (don’t click yet), and a dropdown menu will appear.
Choose Your Layout
Select “Tile Window to Left of Screen” or “Tile Window to Right of Screen.”
The app will snap to one side of the screen.
Pick Your Second App
The other side of the screen will display your available windows.
Click on the app you want to occupy the other half.
And that’s it! You now have two apps sharing your screen in full focus mode.
Pro Tips for Split View Power Users
Adjust Window Sizes: Drag the vertical divider between the two apps to resize them as needed. This is perfect for prioritizing one app while keeping the other handy.
Exit Split View Quickly: Hover over the top of the screen to reveal the menu bar and click the green button again to exit Split View for one app. The other will remain in full-screen mode.
Switch Apps in Split View: Swipe up with three fingers or press
Control + Up Arrowto access Mission Control and swap out one of the apps.
Why Split View is a Productivity Powerhouse
Eliminate Clutter: No overlapping windows means fewer distractions.
Stay Organized: Great for focused workflows where you need two apps equally accessible.
Save Time: No more manually resizing windows and arranging them side by side.
Bonus: Pair Split View with Mission Control
Combine Split View with macOS’s Mission Control feature for ultimate workspace organization. Mission Control lets you create multiple desktops, each with its own Split View arrangement. Swipe between desktops to keep your tasks organized and your mind clear.
Split View is one of those macOS features that’s easy to overlook but can make a big difference once you integrate it into your routine. Give it a try next time you’re multitasking and experience how effortless working on a Mac can be.